Room to Basement Mold Pathways: A Princeton Junction NJ Guide
Cal HewittPublished
- mold remediation
- mold
- basement
- new jersey
- princeton junction
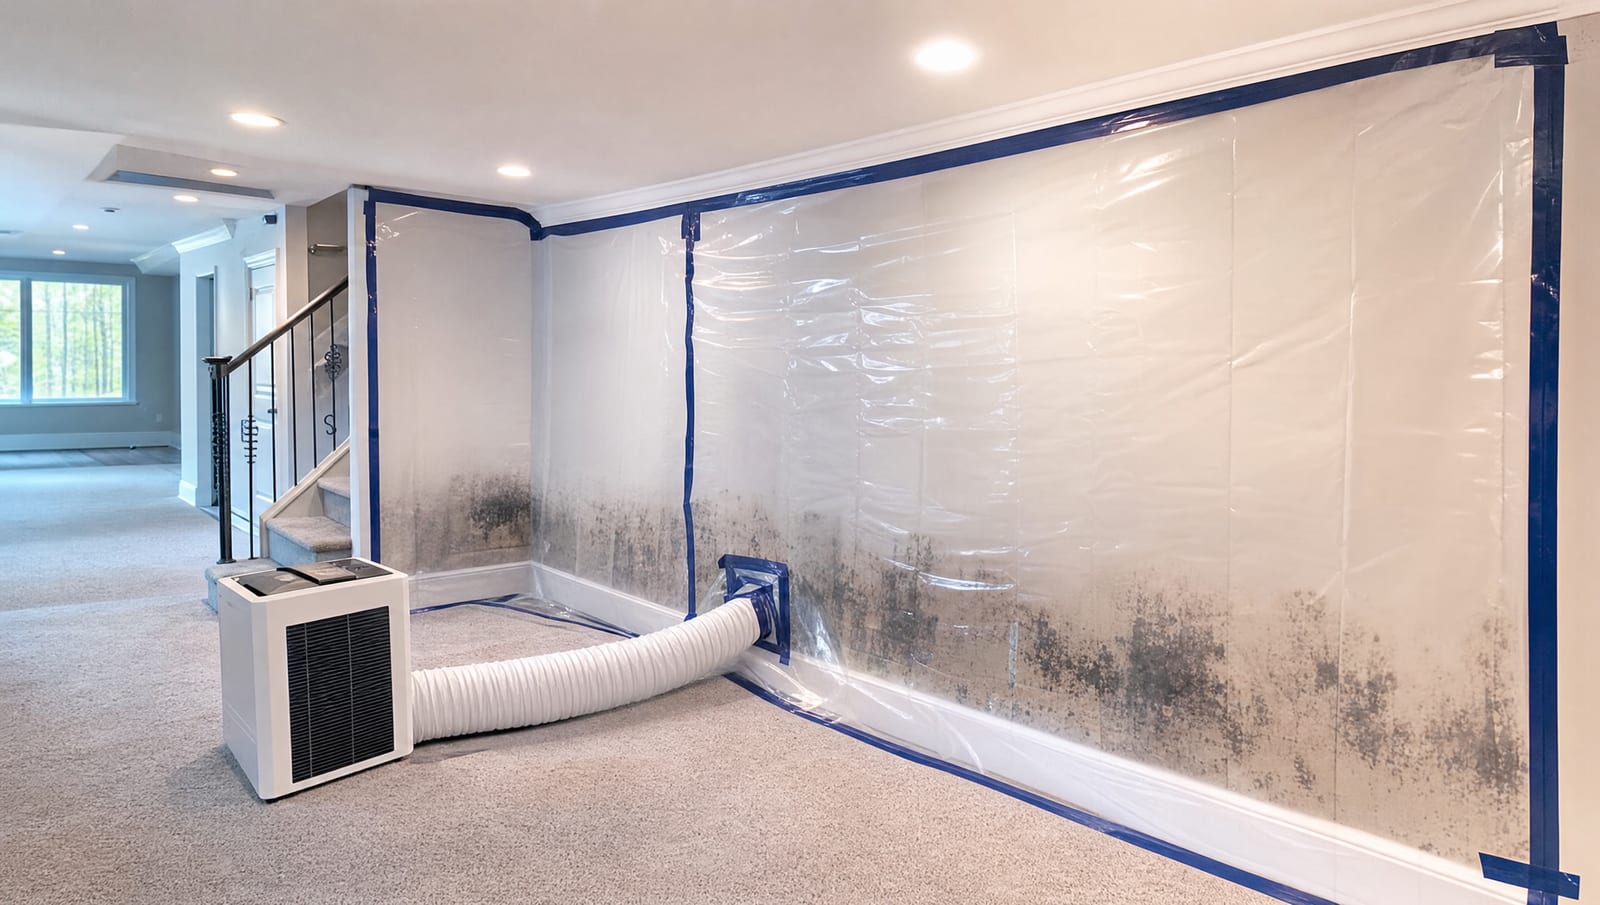
The mold shows up in the finished basement, but that is rarely where the trouble started. In a typical Princeton Junction home, the actual source can be a floor or two above: an HVAC condensate line that has been dripping behind a closet wall, a slow leak under a hall bathroom, or a roof-to-wall seam on an addition that never quite shed water the way it should. The moisture travels down through the structure, following framing and utility runs, and it collects at the lowest finished level. By the time a homeowner notices the musty smell or the dark edge on the basement baseboard, the water has been quietly feeding growth in a spot far from where it entered.
That gap between source and symptom is the whole problem worth understanding before you call anyone. Princeton Junction sits inside West Windsor Township, and its housing runs from older homes near the historic rail village to large postwar and late-century subdivisions, plus townhouses and condominiums. A lot of these homes have additions, finished lower levels, and modern HVAC systems, which are exactly the features that let a small upstairs moisture source turn into a lower-level mold job. This guide traces that pathway and walks through the local decision sequence that a careful remediation follows, from finding the real source to verifying the space is actually clean.
Where the Water Starts and Where the Mold Ends Up
Mold does not need a flood to establish. It needs a food source, which common building materials like drywall, wood framing, and insulation supply, plus sustained moisture and ordinary indoor temperatures. In a suburban home, the sustained moisture often comes from something small and constant rather than one dramatic event.
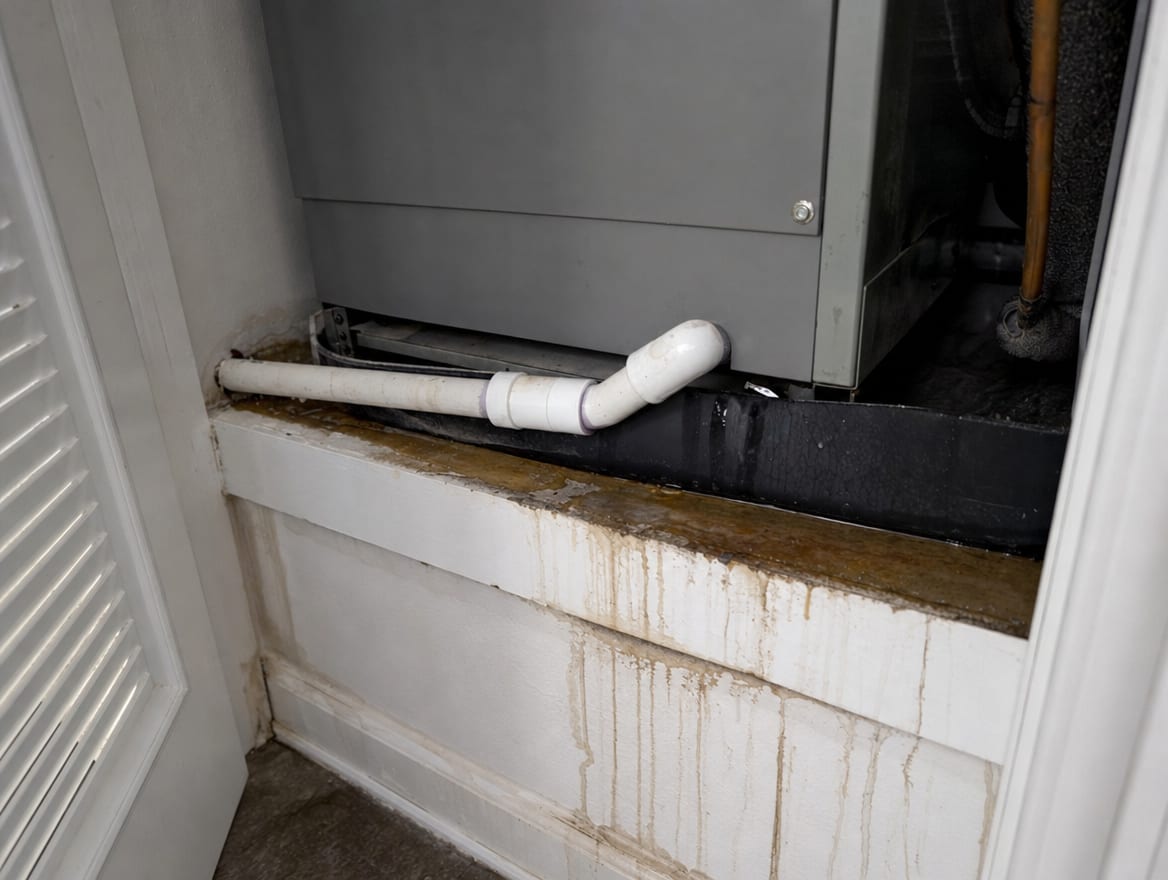
Think about the common upstairs sources. An HVAC system that runs all summer produces condensate, and if the drain pan overflows or the condensate line clogs, that water has to go somewhere. A supply line or drain under a bathroom or kitchen can weep for weeks before anyone sees a stain. An addition, built onto the original house at a later date, joins the old structure at a seam, and roof, wall, and flashing details at that junction are a frequent entry point for rainwater. None of these announce themselves. They release water slowly, and the water moves down.
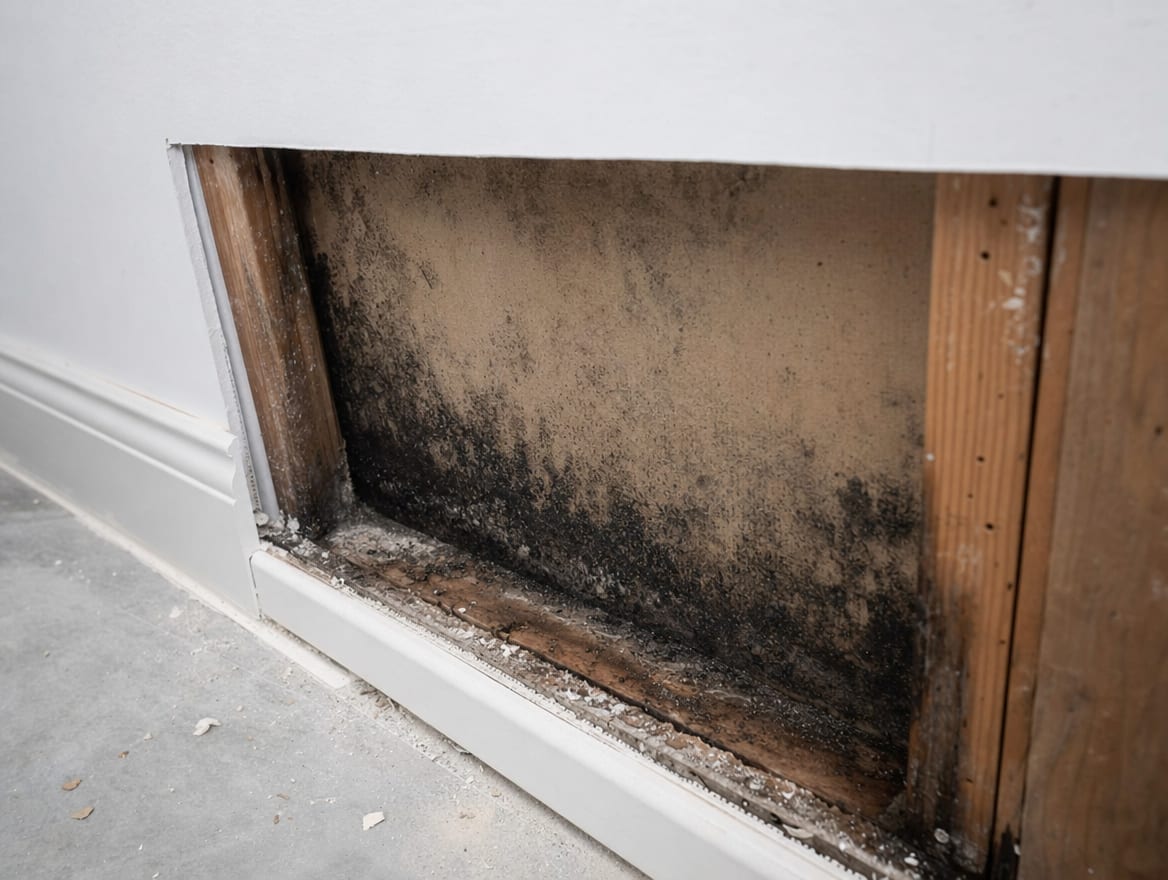
Once inside the structure, water follows gravity and the path of least resistance. It runs along the subfloor, drops into the ceiling below, wicks into wall cavities, travels down utility chases where plumbing and ductwork pass between floors, and finally reaches the finished basement or lowest level. Finished lower levels are where it does the most quiet damage, because the framing, insulation, and drywall behind that finished wall stay dark, still, and slow to dry. That is an ideal setting for mold to take hold well away from the original leak.
Hover or tap a row to highlight it.
| Upstairs or hidden source | How the moisture travels | Where mold tends to appear |
|---|---|---|
| HVAC condensate line or drain pan overflow | Down the utility chase and wall cavity around the air handler | Ceiling, wall, or floor near the lower-level mechanical area |
| Bathroom or kitchen supply or drain leak | Through the subfloor and into the ceiling of the room below | Ceiling below the fixture, then down into lower-level walls |
| Addition roof-to-wall or flashing seam | Behind the addition's exterior wall and down the framing | Base of the addition wall and the finished space beneath it |
| Second-floor laundry line | Through floor cavities toward the lowest level | Framing and insulation along the path, often unseen for weeks |
| Foundation or below-grade entry point | Wicking up and across the lower-level slab and walls | Baseboards, behind paneling, and along the basement floor line |
The point is not that every home has these problems. It is that the source and the symptom are usually in different places, so the search has to follow the building, not just treat the spot where the mold is visible.
Step One: Find the Real Source
The first decision in any credible mold job is identifying where the moisture is coming from, because cleaning growth without correcting the source is a temporary fix. The EPA is consistent on this: controlling moisture is the only reliable way to control mold, and growth is likely to return if the conditions that created it stay in place.
Finding the source in a multi-level suburban home means looking beyond the visible growth. A thorough mold inspection checks the space where the mold appears and then works backward and upward, using moisture meters and thermal imaging to trace damp framing, wet insulation, and cavities that are not visibly stained. This is where the addition seams, the HVAC closet, and the plumbing chases get checked, because those are the pathways that carry water down. Property age alone cannot tell you the source or the foundation type. Only the onsite reading of where the building is actually wet can do that.
Step Two: Classify Safety and Contamination
Once the source is found, the next question is what kind of water and what kind of contamination you are dealing with, because that drives everything after it. A clean HVAC condensate drip is a different situation from a drain-line leak carrying used water, and both differ from groundwater that entered through the foundation. The category affects what can be saved, what has to be removed, and what protective steps the crew needs.
Contamination also depends on how long the material stayed wet. A source that ran unseen behind a finished wall for weeks can shift toward a dirtier condition simply because the water sat. This is also the stage where the crew evaluates whether porous materials are salvageable or need to come out. Porous materials like drywall and insulation that have absorbed water and grown mold usually cannot be cleaned in place, because growth penetrates below the surface. Non-porous surfaces can often be cleaned and kept. Getting this classification right early is what keeps the scope honest.
Signs of Hidden Lower-Level Mold
Musty odor near the floor
A smell that is stronger in the finished basement or along the lowest level, especially after humid weather, often signals growth behind a wall even with nothing visible.
Dark edges on baseboards or paneling
Discoloration low on finished walls, at the base of an addition, or around the mechanical area points to moisture tracking down and collecting.
Cool, damp spots on lower walls
Areas that feel cooler or damp to the touch can mark a wet cavity behind the finish where water has traveled from above.
Recurring stains after painting
A stain that returns after being painted over usually means the moisture source upstairs is still active.
Warped or soft finished surfaces
Buckled trim, bubbling paint, or soft drywall near the floor line are signs that hidden water has been present long enough to do damage.
Step Three: Document Before Anything Is Disturbed
Before removal begins, the conditions get recorded, because once wet drywall is torn out or contaminated insulation is bagged, the evidence of what happened leaves with it. A strong file captures pre-work photos, moisture readings, the source findings, the defined scope and any exclusions, and the location of the growth relative to the source upstairs.
That record matters for more than tidiness. Insurance coverage depends on the policy language, the cause, exclusions, notice, and documentation, and only the carrier can decide what a policy covers. A contractor can document conditions thoroughly and keep the file organized, but a contractor cannot promise that a claim will be paid. Clear records also help everyone see the connection between the upstairs source and the downstairs growth, which is easy to lose once the work is done and the walls are closed back up.
Step Four: Check Parcel and Municipal Constraints
Because Princeton Junction is a community within West Windsor Township, permits and code questions route through West Windsor rather than a separate municipality. When a job involves reconstruction, disturbing regulated materials, or work near mapped constraints, the requirements are verified with the authority having jurisdiction before work proceeds.
Local conditions vary by address, and that is the important part. The area includes stream corridors, wetlands, and FEMA and NJ-mapped flood-hazard zones, but not every property lies in one, so flood exposure has to be checked by parcel rather than assumed. FEMA address-level mapping and NJDEP flood tools are the places to confirm it. Older homes can also carry lead paint or asbestos-containing materials, so if demolition might disturb suspect materials, that calls for extra care. None of these constraints apply to every Princeton Junction home the same way, which is exactly why the check happens per property and per scope.
Step Five: Contain, Remediate, and Dry
With the source found, the water classified, the conditions documented, and the local constraints checked, the physical work follows a defined order. The affected area is contained before removal begins, so that disturbing the growth does not push spores into the rest of the home. This is one of the most important steps, because remediation done without containment can relocate the problem instead of solving it.
Inside the containment, unsalvageable porous materials are removed, salvageable surfaces are HEPA-cleaned, and the space is dried. Professional work here follows the IICRC S520 standard, the industry-accepted protocol for mold remediation, and uses HEPA air scrubbing to capture airborne spores during the process. When the growth sits in a finished lower level, basement mold remediation addresses both the contamination and, where possible, the moisture source driving it, rather than cleaning the surface and leaving the pathway open. When the source turns out to be the HVAC system itself, HVAC mold remediation treats the system components where mold is present, because contaminated ductwork can otherwise distribute spores through the whole house.
Drying is not finished when a surface feels dry. Materials at depth, and the hidden cavities the water traveled through, have to reach a documented dry standard, guided by repeated moisture readings. Skipping that is how moisture gets sealed inside a wall during the rebuild.
The Source-to-Clearance Decision Sequence
- 1
Identify the source
Trace the moisture back to the real origin upstairs or in the structure, not just the spot where mold is visible, using moisture meters and thermal imaging.
- 2
Classify safety and contamination
Determine the water type, how long materials stayed wet, and which porous materials are salvageable versus removal.
- 3
Document conditions
Record pre-work photos, moisture readings, the source findings, and the defined scope before anything is disturbed.
- 4
Check parcel and municipal constraints
Confirm permit and code questions through West Windsor, check flood mapping by parcel, and watch for regulated materials in older homes.
- 5
Contain and remediate
Seal the work area, remove unsalvageable porous materials, HEPA-clean salvageable surfaces, and follow IICRC S520.
- 6
Verify dryness and clearance
Confirm the structure is dry to standard and, when warranted, use independent testing to verify conditions before closing up.
- 7
Repair and rebuild
Reconstruct the finishes only after the source is corrected, the space is dry, and any needed clearance is documented.
Step Six: Verify Dryness and Clearance
Before anyone rebuilds, the work has to be confirmed. Verification has two parts: proving the structure is dry to a documented standard, and, when it is warranted, confirming that mold levels have returned to normal ambient conditions.
Testing is not always required, and it should answer a defined question and change a decision rather than being run by reflex. When it is warranted, post-remediation verification provides an independent record that the treated area has been cleared, which is useful for the homeowner, for an insurance claim, and for a future real estate transaction. Using an independent, accredited lab for that step keeps the result separate from the remediation contractor's interest in a particular outcome. The documentation is the proof that the work reached its intended standard, not just that the visible growth is gone.
Step Seven: Repair Only After the Space Is Clean and Dry
The last and one of the most costly mistakes is rebuilding too early. New drywall, flooring, and paint installed over a wet cavity or an uncorrected source can trap moisture and set up repeat growth behind a wall that looks finished. In a market like Princeton Junction, where homes trade often, that kind of hidden repeat problem can surface later during a sale.
Reconstruction begins only after the file shows the source is corrected, the structure is dry to standard, the porous materials that had to go were removed, and any needed clearance is documented. Then the finishes that were removed get rebuilt, this time over materials that are confirmed dry and a moisture pathway that has actually been closed. That order is what turns a remediation into a lasting fix instead of a temporary cleanup.
Frequently Asked Questions
How soon should a homeowner respond to a suspected moisture source?
Right away, and safely. Address safety first and stop further water when it is safe to do so. The EPA advises drying wet materials within 24 to 48 hours when possible to reduce the risk of mold, so a source found early gives you the best chance of a smaller job. A slow leak that ran unseen behind a finished wall may already be past that window by the time it is discovered, which is why hidden lower-level moisture gets a closer look.
Is mold testing always required?
No. Testing should answer a defined question and change a decision, not run by default. In many cases the visible growth and the moisture readings already tell the crew what to do. Testing becomes useful when the extent is unclear, when documentation is needed, or when clearance verification is warranted after the work.
Will homeowners insurance cover the remediation?
Only the carrier can decide, based on the policy language, the cause, exclusions, notice, and documentation. Coverage often depends on whether the water came from a sudden covered event versus long-term moisture, and flood exposure is handled separately from standard homeowners coverage. A contractor can provide thorough documentation to support a claim, but a contractor cannot guarantee that the insurer will pay.
What contractor claims should be treated as red flags?
Be cautious of guaranteed health outcomes, guaranteed insurance coverage, a promise of permanent prevention without correcting the moisture source, a one-product cure, or a final scope quoted without an adequate inspection. A credible process starts with finding the source and defines completion criteria before the work is called done.
Does every Princeton Junction home have the same flood or permit situation?
No. The area includes stream corridors, wetlands, and mapped flood-hazard zones, but not every parcel sits in one, and permit and code questions route through West Windsor case by case. Flood exposure and any approval requirements are checked by address and by the specific scope of work, never assumed to be the same for every property.
When you want a clear picture of where the moisture is coming from and where it is doing damage, ExecPro Restoration & Cleaning traces the pathway from the upstairs source to the finished lower level, contains and remediates the growth to standard, and documents the work from inspection through verified clearance. Call ExecPro Restoration & Cleaning at (888) 300-3772 or reach out through the contact form to get answers and a clear plan for your Princeton Junction property.
Mold Pathway Terms to Know
Tap a term to see what it means.
IICRC S520. The industry-accepted standard for professional mold remediation that a documented, defensible job follows.
Serving Princeton Junction
ExecPro Restoration & Cleaning provides mold remediation services in Princeton Junction, NJ, from inspection and testing through removal, drying, and post-remediation verification. Call (888) 300-3772 for 24/7 emergency response.
Related Articles
Salt Air or a Leak: Finding the Mold Source in Deal, NJ
Owners in Deal, NJ often blame salt air for mold, but the real cause is usually a findable leak, ground vapor, or condensation. Here is how to trace it.
One Home, Many Air Zones: Designing Indoor Air Testing for Princeton Junction, NJ Properties
Indoor air is not one thing across a Princeton Junction, NJ home. Learn how to design air-quality testing per zone, per floor, and against an outdoor baseline.
Property Management Mold Services in Princeton Junction, NJ: A Repeatable Protocol for Managed Homes and Multifamily Units
How Princeton Junction property managers run mold response across managed units: pre-authorized access, a leak escalation path, and a consistent closeout file.