Crawl Space Mold Removal in Princeton NJ: What to Know
Cal HewittPublished
- crawl space mold
- mold remediation
- encapsulation
- new jersey
That musty smell drifting up through your floorboards is easy to ignore once or twice. But if you're a Princeton homeowner who keeps catching that earthy odor every time the windows are closed, your crawl space may already be working against you. Crawl space mold removal in Princeton NJ is one of the most common calls we receive after a home inspection flags something below the floors, and for good reason: most people have never looked under their house, and when they finally do, what they find can range from a small moisture problem to widespread structural damage.
Mold in a crawl space doesn't announce itself with visible warning signs in your living room. It grows quietly in the dark, feeding on wood framing, destroying insulation, and sending spores upward through every gap, crack, and electrical penetration into the rooms where your family breathes. The good news is that this problem is well understood, and there is a clear professional process for resolving it completely.
Key Takeaways
Crawl spaces are mold hotspots
Direct ground contact, poor airflow, and New Jersey's humidity create ideal conditions for mold growth year-round
Mold affects your entire home's air
The stack effect circulates mold spores from your crawl space directly into your living spaces
Six warning signs to watch for
Musty odor, worsening allergies, warped floors, visible dampness, wetness on pipes, and recent water events
Professional remediation follows five steps
Inspection, mold removal, encapsulation, drainage and moisture control, and post-remediation verification
Cost ranges from $1,200 to $8,000 or more
Final price depends on crawl space size, mold severity, and whether encapsulation and dehumidification are included
DIY approaches rarely hold
Without addressing the root moisture cause, mold will return regardless of how thoroughly the surface was cleaned
Why Crawl Space Mold Is Such a Big Problem in New Jersey
The crawl space under a Princeton home is not just empty air. It is a functioning part of the structure, one that controls moisture levels, air quality, and the condition of your floor joists and subfloor. When that space is compromised by mold, the effects travel upward into every room above it.
New Jersey's climate creates year-round moisture pressure that homeowners in drier states simply don't experience. Humid summers push crawl space humidity above 50 percent, which is the threshold where fungal activity becomes highly active. Wet winters send groundwater through foundation walls and up through dirt floors. Central NJ homes sit in a climate zone that keeps crawl spaces fighting moisture twelve months a year, and that constant pressure is why mold doesn't need a flood to get started. It just needs time.
The stack effect is what makes crawl space mold a whole-home problem rather than a below-the-floor problem. Warm air inside your home rises and exits through the upper levels, pulling air upward from the lowest points of the structure. That means air from your crawl space, carrying mold spores, passes through floor gaps, plumbing penetrations, and electrical openings before circulating through your kitchen, bedrooms, and living areas. When a family member develops unexplained respiratory symptoms or allergies that don't respond to treatment, mold spores traveling via the stack effect are often part of the explanation.
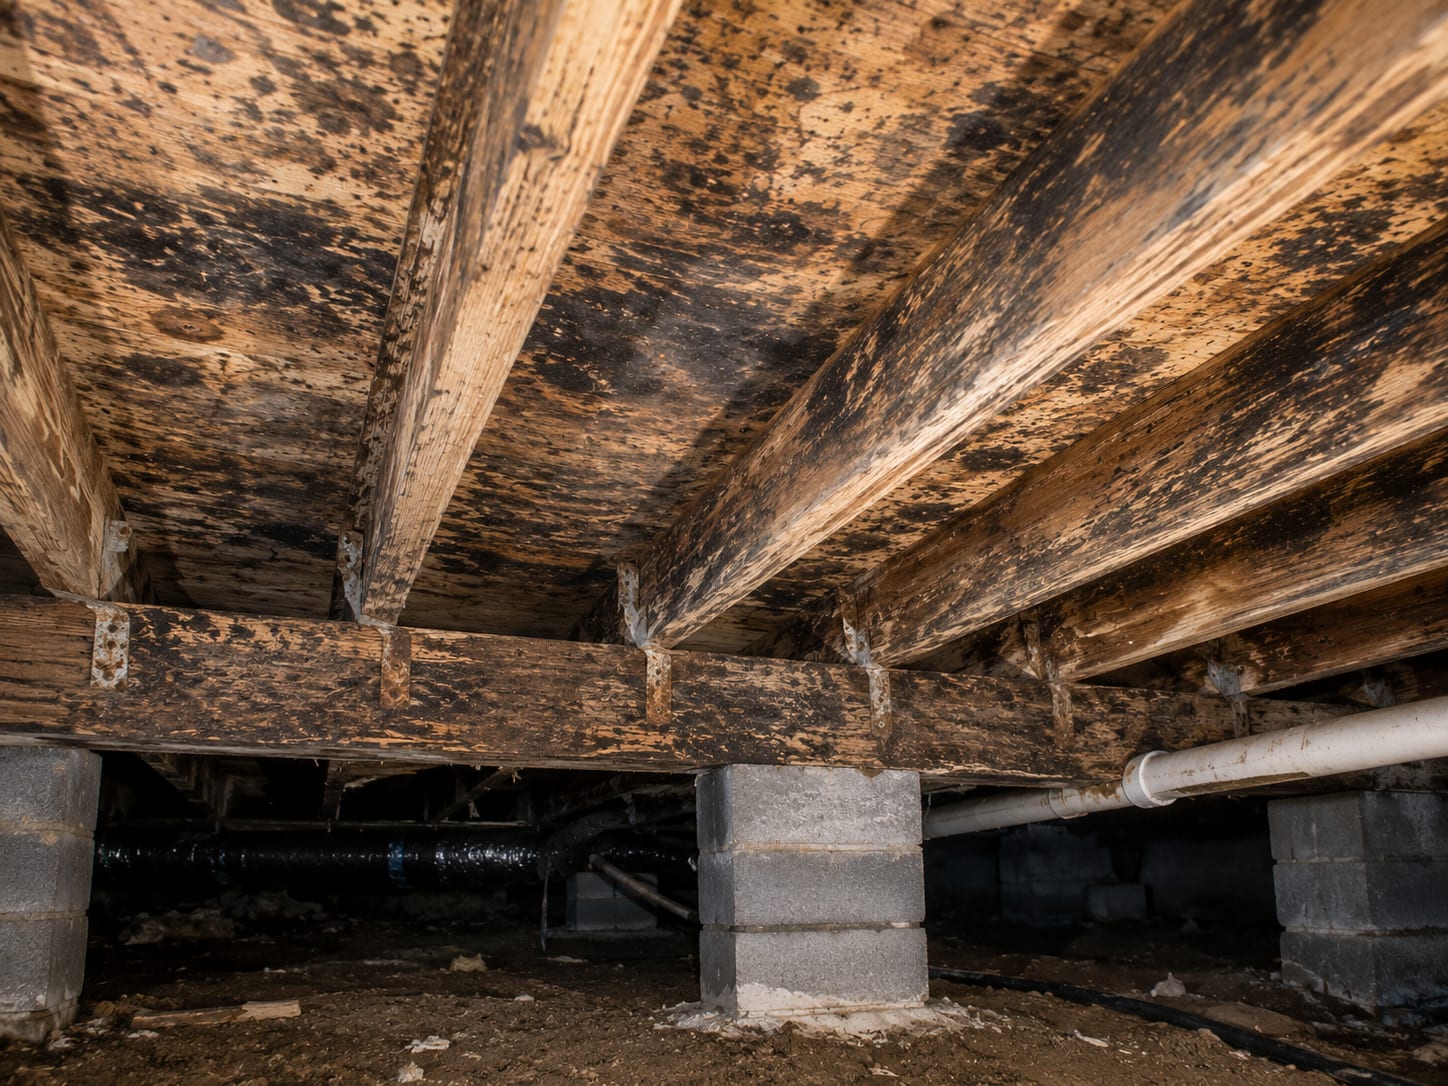
Beyond air quality, mold on wood joists and subflooring causes structural damage that gets more expensive to repair the longer it goes untreated. Wet, mold-damaged insulation loses its ability to regulate temperature, driving up energy costs while becoming a reservoir for more mold growth. Damp wood also attracts carpenter ants, termites, and rodents, adding pest damage to an already complicated repair picture.
Warning Signs Your Crawl Space Has Mold
Many homeowners discover crawl space mold only after a home inspector raises the alarm. But the warning signs often appear long before that moment, and catching them early means lower repair costs.
A persistent musty odor is usually the first signal. If you notice a strong, earthy smell inside your home when windows and doors are closed, and the smell intensifies in certain rooms or on lower floors, active mold releasing spores may be the source. The odor tends to get stronger during humid weather because mold activity increases with moisture.
Unexplained respiratory issues, worsening allergies, wheezing, or general fatigue that improves when you leave the house are also strong indicators. Mold spores are a known asthma trigger, and children, elderly individuals, and people with compromised immune systems are most vulnerable. Warped or buckling floorboards are a physical sign that moisture has been working on the subfloor from below. If your wood floors look uneven in areas that were once level, the problem is likely under your feet, not in the flooring itself.
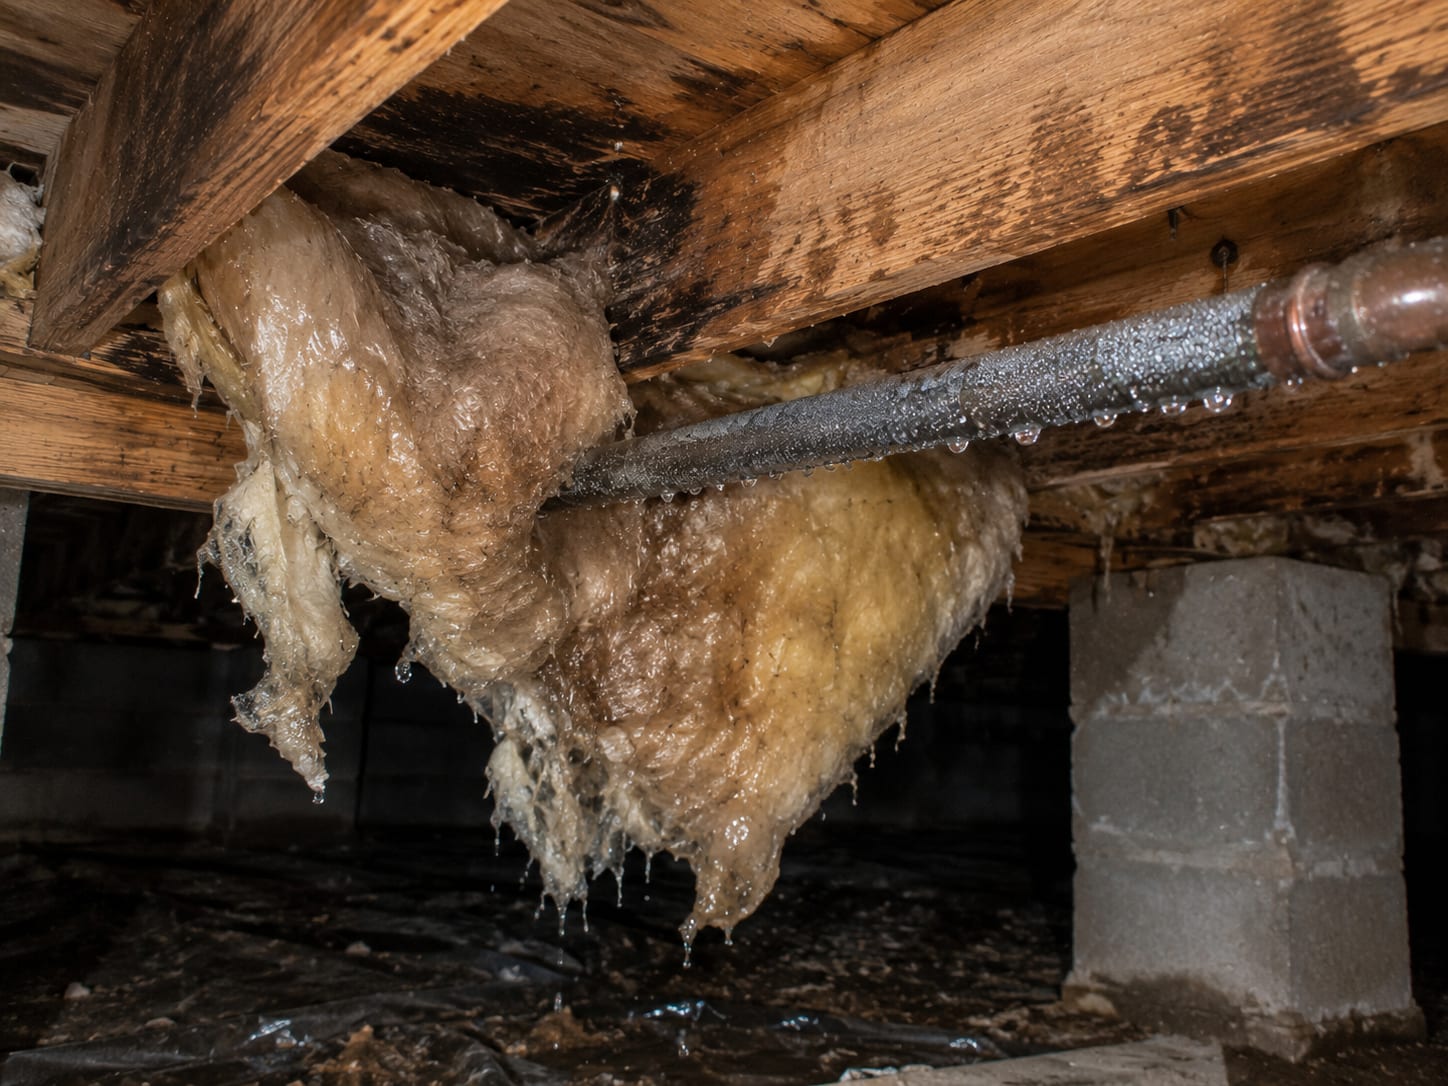
Visible wetness inside the crawl space confirms that mold is either already present or imminent. Wet insulation, damp wood, standing water, and condensation on pipes or ductwork all indicate conditions where mold thrives. If your home has experienced any flooding, burst pipes, or foundation leaks in the past, be aware that mold can begin growing within 24 to 48 hours of a water event, even in areas that appeared to dry out afterward.
Hover or tap a row to highlight it.
| Warning sign | What it points to |
|---|---|
| Persistent musty, earthy odor indoors | Active mold releasing spores, stronger during humid weather |
| Respiratory issues, worsening allergies, fatigue that eases away from home | Mold spores circulating as a known asthma trigger |
| Warped or buckling floorboards | Moisture working on the subfloor from below |
| Wet insulation, standing water, condensation on pipes or ductwork | Conditions where mold is already present or imminent |
| Recent flooding, burst pipes, or foundation leaks | Mold can begin growing within 24 to 48 hours of a water event |
The Six Root Causes of Crawl Space Mold
Understanding what creates mold helps you understand why professional remediation has to address more than the visible growth. Each of these causes requires a specific fix, and skipping any one of them leaves a door open for mold to return.
High humidity above 50 percent is the most direct trigger. When crawl space air holds too much moisture, fungal activity on wood and insulation begins quickly. A properly rated crawl space dehumidifier, maintained consistently, is the primary tool for keeping humidity below that threshold.
Ground water vapor rises constantly from dirt floors and clings to wood framing above, causing mold on floor joists and subflooring even when no obvious water source is present. A 12 to 20 mil vapor barrier sealed at every seam is the standard solution.
Foundation wall seepage allows groundwater to soak through masonry. White powder on your foundation walls, called efflorescence, is a visible indicator that water is pushing through the concrete or block. Sealing cracks, applying moisture-resistant coatings, and installing perimeter drains address this entry point.
Poor air circulation keeps damp air stagnant against wood surfaces, preventing moisture from evaporating. Sealing crawl space vents and installing an airtight access door, paired with mechanical dehumidification, creates the controlled environment that prevents moisture from pooling.
Condensation on ductwork and pipes forms when warm, humid crawl space air contacts cool metal surfaces. That condensation drips onto insulation and wood below, creating a secondary moisture source that's easy to overlook. Properly insulating ducts and pipes eliminates this cycle.
Flooding and poor drainage are the most acute causes. Standing water triggers mold growth fast, and even minor recurring water intrusion from inadequate gutters or negative grading keeps conditions ripe for growth. Sump pumps, French drains, and corrected exterior grading are the long-term fixes.
Six Root Causes and Their Fixes
High humidity above 50 percent
A properly rated crawl space dehumidifier, maintained consistently, keeps humidity below the threshold.
Ground water vapor
A 12 to 20 mil vapor barrier sealed at every seam blocks vapor rising from dirt floors.
Foundation wall seepage
Sealing cracks, applying moisture-resistant coatings, and installing perimeter drains stop groundwater from soaking through masonry.
Poor air circulation
Sealed vents, an airtight access door, and mechanical dehumidification keep damp air from stagnating against wood.
Condensation on ductwork and pipes
Insulating ducts and pipes eliminates the drips that create a secondary moisture source.
Flooding and poor drainage
Sump pumps, French drains, and corrected exterior grading handle standing water and recurring intrusion.
The Five-Step Professional Crawl Space Mold Remediation Process
Professional crawl space mold remediation is not a single visit with a spray bottle. It is a systematic process that requires specialized equipment, proper sequencing, and verification at the end. Here is what a complete, properly executed remediation looks like.
The Five-Step Remediation Process
- 1
Comprehensive inspection and assessment
Thermal imaging, moisture meters, and air quality testing establish a baseline and locate hidden moisture.
- 2
Mold removal and deep cleaning
Negative air pressurization contains the space while contaminated materials are removed and affected wood is treated at the source.
- 3
Crawl space encapsulation
A 12 to 20 mil vapor barrier seals the floor and foundation walls, blocking 95 to 99 percent of ground moisture.
- 4
Drainage and moisture control
Perimeter drains, a sump pump, and a correctly sized dehumidifier keep humidity below 50 percent.
- 5
Post-remediation verification
Moisture and air quality testing confirm the work held, with documentation provided to the homeowner.
Step 1: Comprehensive Mold Inspection and Assessment
A thorough mold inspection is the foundation of effective remediation. Technicians use thermal imaging cameras to detect hidden moisture behind foundation walls and under the subfloor, not just what's visible to the naked eye. Moisture meters measure humidity levels in wood, insulation, and air to establish a baseline. The inspection also covers structural condition, insulation integrity, air movement patterns, and any active leaks or drainage failures. Air quality testing in the living spaces determines whether mold spores are already circulating through the home.
Step 2: Mold Removal and Deep Cleaning
Before any other work begins, the mold itself must come out. Technicians set up negative air pressurization inside the crawl space, creating a contained environment where spores cannot migrate upward during removal. Contaminated insulation and damaged materials are safely extracted, and HEPA vacuums capture spores from surfaces without spreading them. Affected wood on joists and subfloor is then sanded, scraped, or dry-blasted to remove mold at the source rather than just treating the surface. EPA-approved antimicrobial treatments are applied to kill residual mold and inhibit regrowth. The order matters: mold must come out before any other contractor works in the space, or cross-contamination will follow.
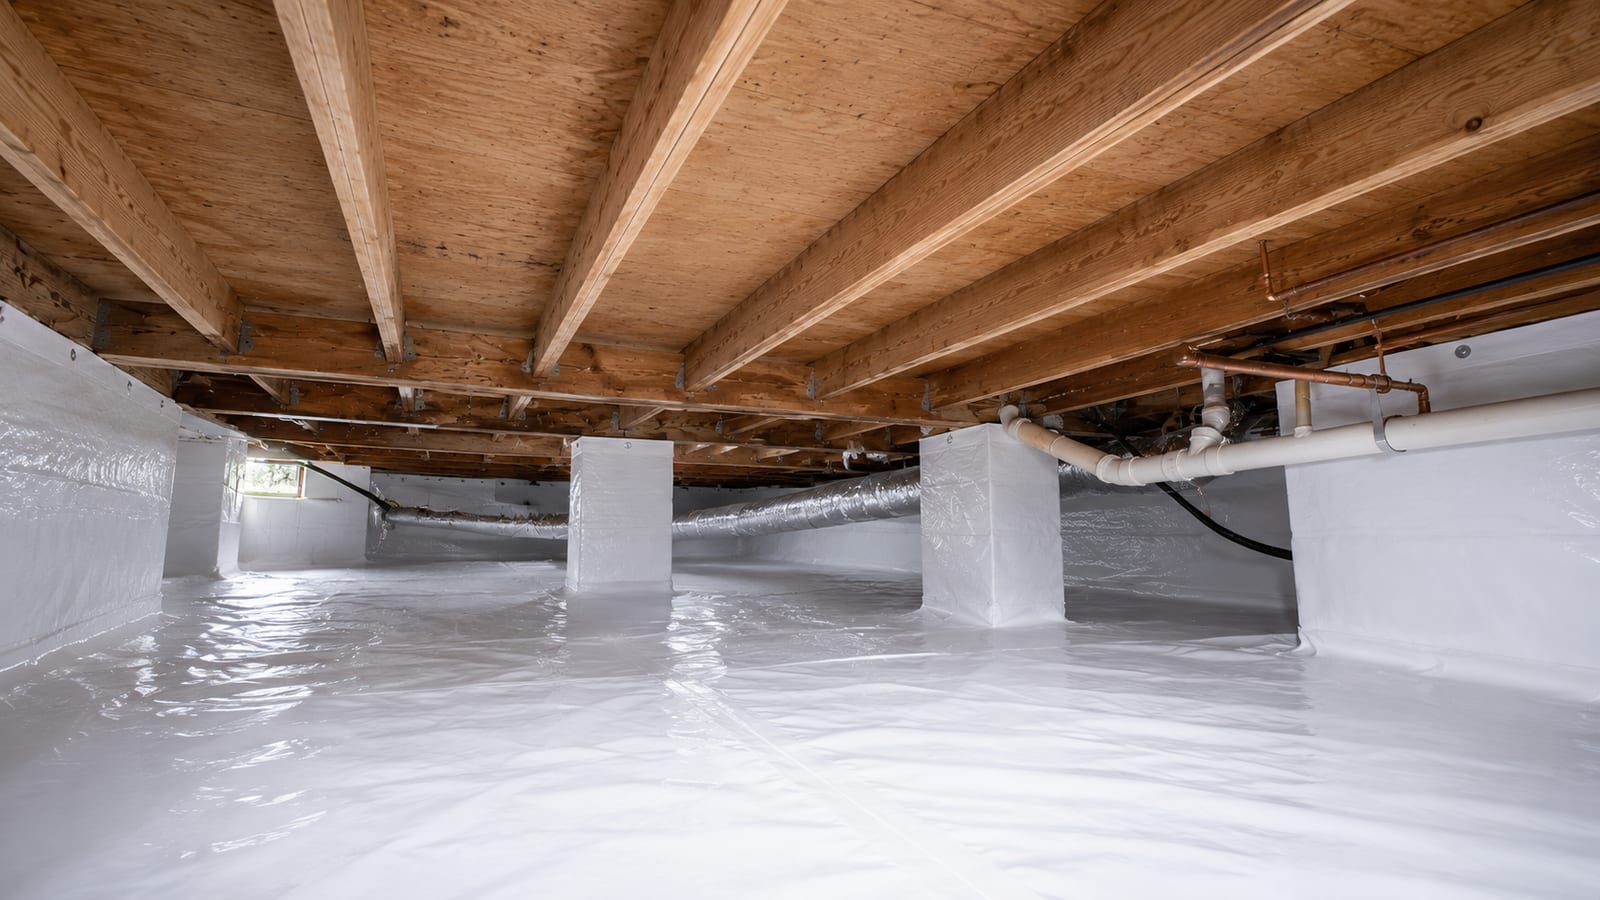
Step 3: Crawl Space Encapsulation
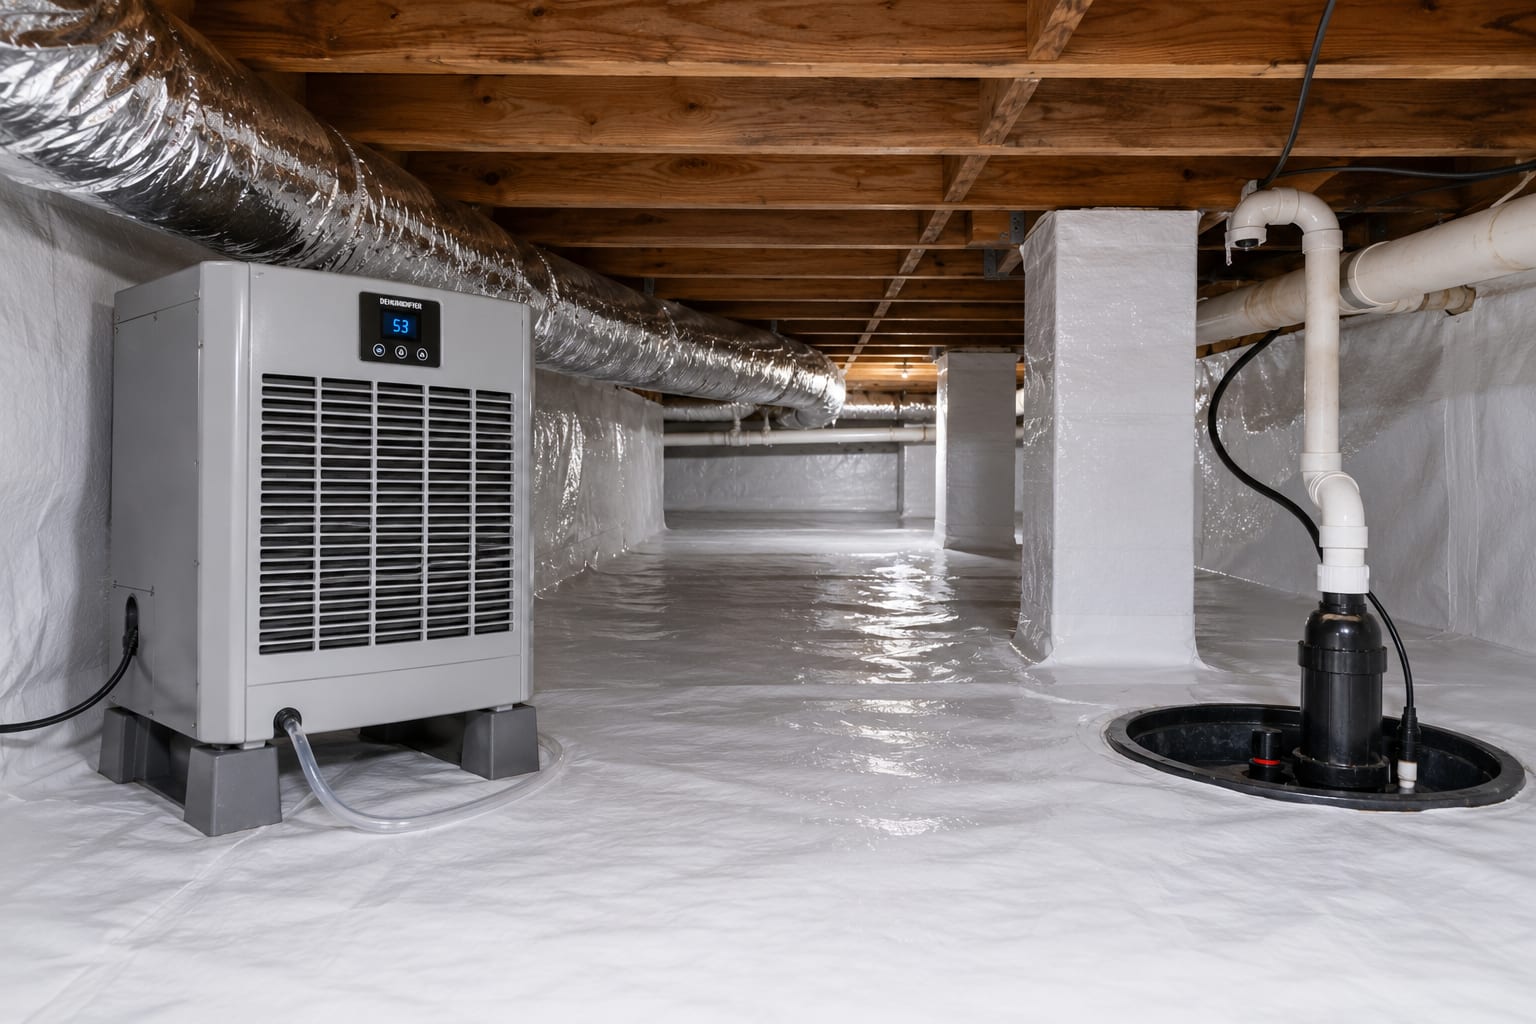
Encapsulation is the step that separates a temporary fix from a permanent solution. A 12 to 20 mil polyethylene vapor barrier is installed over the dirt floor and extends up the foundation walls, sealed at every seam and edge. All crawl space vents are closed and sealed to block outside humidity from entering, the access door is replaced with an insulated airtight unit, and foundation wall penetrations are sealed as well. A properly installed encapsulation system blocks 95 to 99 percent of ground moisture from entering the space, creating a dry, controlled environment that mold cannot colonize.
Step 4: Drainage and Moisture Control Systems
Even a fully encapsulated crawl space needs active moisture management, especially in New Jersey's wet climate. Perimeter drains or French drains channel water away from the foundation before it can pool below the floor. Sump pumps are installed at the lowest point to automatically remove any water that does enter. A professional crawl space dehumidifier, sized correctly for the space, runs continuously to maintain humidity below 50 percent and often drains directly into the sump pump for hands-free operation.
Step 5: Post-Remediation Verification
After remediation is complete, testing confirms that the work was successful. Technicians measure moisture levels in wood, air, and insulation to verify they fall within safe ranges. Air quality testing in living spaces checks that mold spores are no longer circulating through the home. Documentation of the completed remediation is provided to the homeowner, which is particularly valuable for real estate transactions where a buyer or lender needs verified proof that the problem was professionally resolved.
What Professional Crawl Space Mold Removal Costs in NJ
Cost depends on several variables. Here is a realistic breakdown of what Princeton area homeowners can expect.
Basic residential projects involving inspection, mold removal, and cleaning typically run between $1,200 and $4,000. Moderate cases that include full mold removal plus encapsulation and dehumidifier installation generally fall in the $4,000 to $6,000 range. Extensive cases involving significant structural damage, drainage systems, sump pump installation, and complete encapsulation can run $6,000 to $8,000 or more. Crawl space size, mold severity, whether active water intrusion requires drainage work, and whether structural repairs are needed all affect the final number.
Hover or tap a row to highlight it.
| Project scope | What it includes | Typical cost |
|---|---|---|
| Basic | Inspection, mold removal, and cleaning | $1,200 to $4,000 |
| Moderate | Full mold removal plus encapsulation and dehumidifier installation | $4,000 to $6,000 |
| Extensive | Structural damage, drainage systems, sump pump, and complete encapsulation | $6,000 to $8,000 or more |
One point worth understanding: the lowest bid is often the most expensive outcome. A remediation that skips proper containment, omits encapsulation, or fails to address the moisture source will result in mold returning. You'll pay for removal twice, and the structural damage will have continued in the meantime.
Common Mistakes Homeowners Make With Crawl Space Mold
- DIY surface cleaning only: Store-bought cleaners and vinegar solutions address visible surface mold but leave the moisture source intact, which means the mold simply grows back within weeks or months
- Treating moisture before removing mold: The correct sequence is mold removal first, then moisture remediation. Bringing other contractors in before mold is cleared causes cross-contamination throughout the work area
- Skipping encapsulation: Cleaning mold from joists without installing a vapor barrier leaves the ground moisture source completely unaddressed, guaranteeing recurrence
- Choosing the lowest price: Bids that omit proper containment, HEPA equipment, or negative air pressure skip the steps that prevent mold spores from spreading during removal
- Not verifying air quality after remediation: Skipping post-remediation air quality testing in living spaces means you can't confirm whether spores are still circulating above the crawl space
- No ongoing maintenance plan: A dehumidifier that goes unmaintained or a vapor barrier that develops an undetected tear will allow moisture to return, restarting the cycle
How to Prevent Crawl Space Mold From Returning
After professional remediation, keeping moisture under control is an ongoing responsibility. Once the systems are in place, the maintenance is manageable.
Maintain the dehumidifier monthly by cleaning its filters and confirming it's running continuously through New Jersey's humid spring, summer, and fall months. Use a humidity monitor to keep crawl space levels below 50 percent, and address any spikes before mold has time to establish itself. Inspect the vapor barrier annually for tears, gaps, or shifting. Even a small breach can allow significant ground moisture to enter over time.
Outside the home, clean gutters regularly and make sure downspouts direct water at least six feet away from the foundation. Correct any grading that slopes toward the house rather than away from it, and fix foundation cracks and plumbing leaks as soon as they appear. Scheduling an annual professional crawl space inspection gives you an early warning if something is changing. Small moisture problems caught early cost far less to address than the full remediation cycle that comes from years of undetected issues.
Frequently Asked Questions About Crawl Space Mold Removal Princeton NJ
How much does crawl space mold removal cost in New Jersey?
Basic residential projects typically range from $1,200 to $4,000 for inspection and mold removal. Moderate cases that include encapsulation and a dehumidifier run $4,000 to $6,000. Extensive situations involving drainage systems, sump pumps, and structural repairs may exceed $8,000. Size, mold severity, active moisture issues, and whether encapsulation is included all influence the final cost.
Can I remove crawl space mold myself with DIY products?
DIY solutions rarely hold long-term because they address visible mold without fixing the moisture source that caused it. Professional crawl space mold remediation requires thermal imaging cameras, HEPA vacuums, negative air pressure systems, and moisture meters, along with certified technicians who can identify and correct the root cause. Most homeowners who attempt DIY removal find the mold returns within a season.
How long does professional crawl space mold remediation take?
Most projects take between two and five days, depending on crawl space size, mold severity, and whether encapsulation and drainage systems are being installed. Cases involving structural repairs or extensive drainage work may take longer. Your contractor should give you a timeline after the initial inspection.
Will crawl space mold affect my home's air quality?
Yes. The stack effect moves air from your crawl space upward through floor gaps, plumbing penetrations, and electrical openings into your living areas. Mold spores travel this path continuously, which is why respiratory symptoms and allergy flare-ups are common warning signs even when the mold itself is never visible to the homeowner.
What is the difference between mold removal and mold remediation?
"Mold removal" implies every trace of mold is eliminated, which is not technically possible since mold spores exist naturally in all environments. "Mold remediation" is the accurate term for the professional process: reducing mold to safe, normal background levels, removing contaminated materials, applying antimicrobial treatments, and preventing return through encapsulation and moisture control. Remediation is the term used by IICRC-certified professionals.
How do I know if my crawl space needs encapsulation?
Any crawl space with confirmed mold growth, humidity consistently above 50 percent, visible moisture or condensation, a dirt floor with no vapor barrier, or a history of water intrusion needs encapsulation. It is the single most effective step for long-term mold prevention, and skipping it means the moisture source remains active regardless of how well the mold itself was cleaned.
What certifications should I look for in a mold remediation company?
Look for technicians holding IICRC certifications from the Institute of Inspection, Cleaning and Restoration Certification, along with OSHA training on safe mold handling and containment procedures. Reputable companies use EPA-approved antimicrobial treatments and follow established protocols for containment, proper disposal of contaminated materials, and post-remediation verification.
Test Your Crawl Space Mold Knowledge
1. How long does professional crawl space mold remediation usually take?
2. At what humidity level does crawl space fungal activity become highly active?
3. How does crawl space mold reach the living spaces above it?
4. How soon can mold begin growing after a water event?
5. Which certification should a mold remediation company hold?
Pick an answer to begin.
Final Thoughts
Crawl space mold is not a cosmetic problem you can put off until a more convenient time. It compromises your indoor air quality through the stack effect, feeds on the wood framing holding up your floors, and surfaces in home inspection reports at exactly the wrong moment in a real estate transaction. The process for resolving it is well-established: a proper inspection, professional mold removal with full containment, crawl space encapsulation, active moisture control, and verified testing to confirm the result. Each step matters, and skipping any one of them tends to mean doing it all over again.
Homeowners who address crawl space mold completely, with encapsulation and moisture systems in place, typically see the problem stay resolved for years. Energy costs often drop as well, since dry, insulated crawl spaces are easier and cheaper to heat and cool. That combination of better air quality, protected structure, and improved energy performance makes remediation an investment rather than just an expense.
At ExecPro Restoration & Cleaning, we handle the full scope of crawl space mold remediation for homeowners throughout New Jersey, including Princeton and the surrounding communities. From the initial mold inspection and air quality testing through professional mold removal, crawl space encapsulation, water extraction, structural drying, and rebuild services, our team manages every step so you're not coordinating multiple contractors during an already stressful situation. We use thermal imaging, moisture mapping, and post-remediation verification to give you and any involved real estate agents or insurance adjusters the documented proof that the work was done correctly. If you're dealing with mold in your crawl space or just want to know what's down there, contact us to schedule an inspection.
Crawl Space Mold Terms
Tap a term to see what it means.
Stack effect. Warm indoor air rising and exiting the upper floors, which pulls crawl space air, and its mold spores, upward into living spaces.
Serving Princeton
ExecPro Restoration & Cleaning provides mold remediation services in Princeton, NJ, from inspection and testing through removal, drying, and post-remediation verification. Call (888) 300-3772 for 24/7 emergency response.
Related Articles
The Deal, NJ Crawl-Space Investigation: Planning Mold Remediation Around Coastal Moisture and the Summer Building Moratorium
A Deal, NJ crawl-space mold job is a sequence of local calls: trace the moisture source, check flood risk by address, and time work around the summer moratorium.
One House, Several Below-Grade Zones: Crawl Space Mold Remediation in Princeton Junction, NJ
A Princeton Junction NJ home can have a dry full basement and a damp crawl space under an addition. Map each below-grade zone before you remediate mold.
Reopening a Deal NJ Shore Home: When Air Quality Testing Answers a Real Question
Reopening a closed Deal NJ shore home? Learn when air quality testing helps after vacancy, humidity, a storm, or renovation, and what a test cannot tell you.