Behind the Finished Wall: Basement Mold and Old Foundations in Princeton, NJ
Cal HewittPublished
- basement mold remediation
- basement mold
- mold remediation
- historic homes
- new jersey
- princeton
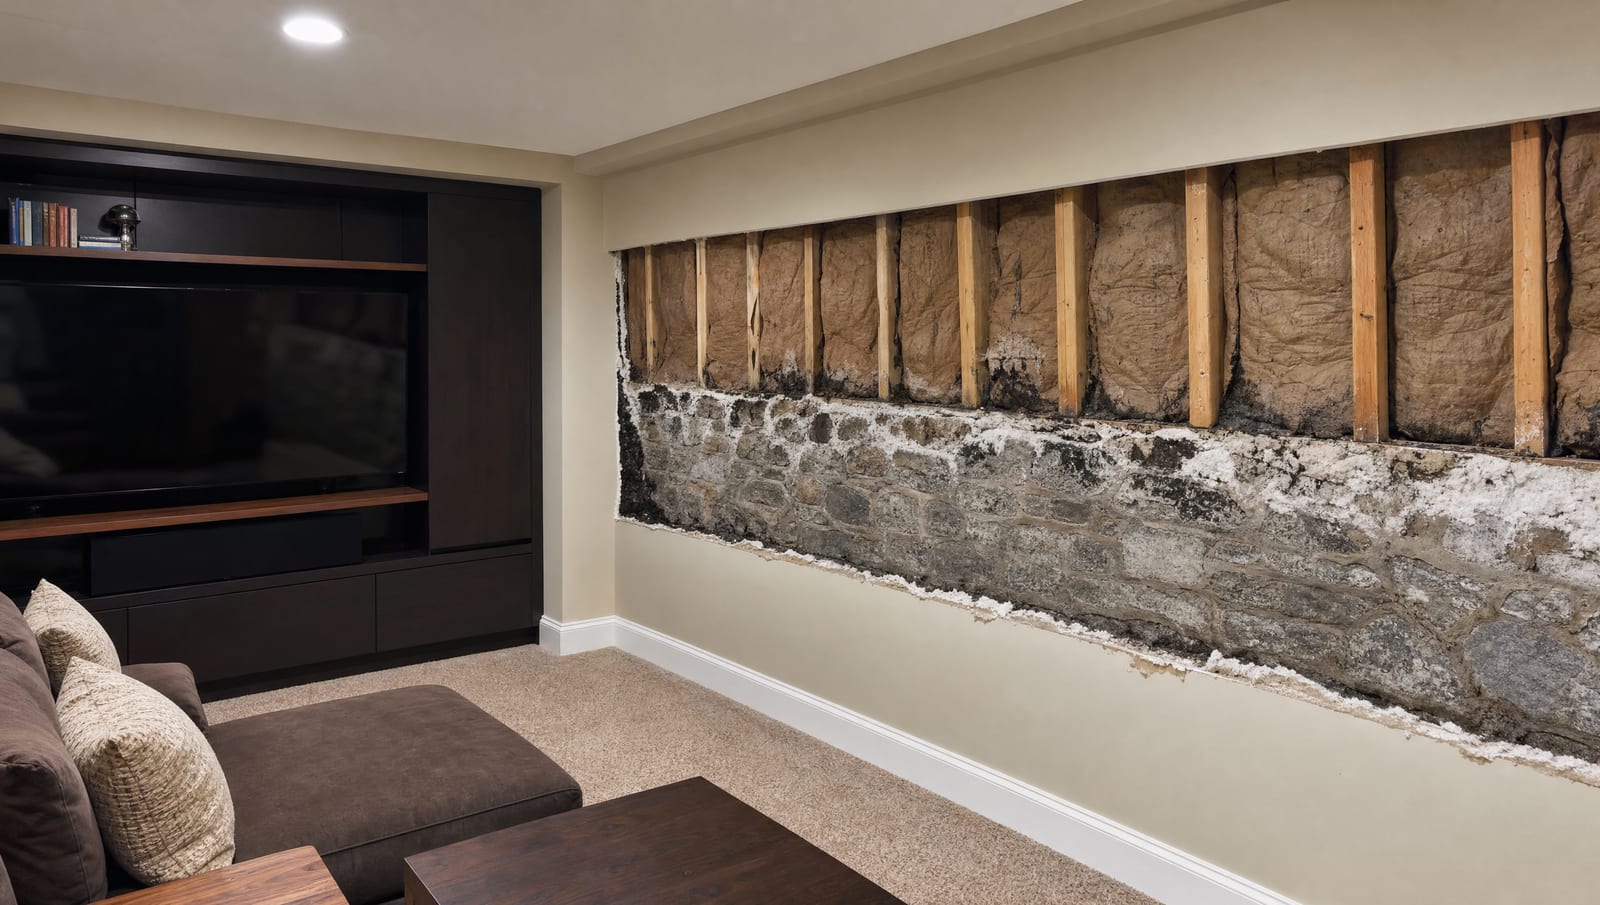
The room looked finished. Recessed lighting, a mounted television, soft carpet, and a wall of built-in cabinets filled what had once been the raw cellar of an old Princeton home. There was no puddle on the floor and no dripping pipe overhead. What the homeowners noticed instead was a faint, earthy smell that grew stronger on humid days and never quite went away, even after they cleaned and aired out the room. When a moisture meter was run along the base of that finished wall, the readings climbed. Behind the drywall and the framing sat the home's original stone foundation, and behind the clean surface, out of sight, moisture had been feeding mold for longer than anyone realized.
This is a common story in Princeton, and it does not start with a flood. It starts with an old foundation that was built to breathe, a set of modern finishes added decades later, and a small change in how moisture moves through the assembly. The room can look perfect while the trouble sits an inch behind the paint. Understanding that gap between how a basement looks and what is actually happening inside the wall is the key to fixing it once, instead of covering it up and watching it return.
Why Old Foundations and Modern Finishes Can Conflict
Princeton has homes that span several centuries, from eighteenth-century Colonials near the old borough core to Victorian residences, early-twentieth-century houses, and newer construction. Many of the older ones rest on stone, brick, or early concrete foundations built with lime-based mortar. These walls were never sealed the way a modern basement is. For generations they took on some dampness and released it back into open, unfinished air. As long as nothing trapped that moisture, the system worked in its own imperfect way.
The conflict begins when a later renovation turns that raw cellar into living space. Framing goes up against the old wall. Insulation, drywall, flooring, trim, and cabinetry follow. Now the moisture that the masonry used to shed into open air has a barrier in front of it. If that moisture cannot dry, it collects in the hidden cavity between the old wall and the new finish. Add warm indoor air, cooler masonry surfaces, and the humid New Jersey summers, and you have the conditions mold needs. The old foundation is not the villain, and the modern finish is not the villain. The problem is the interface where the two meet and moisture has nowhere to go.
How Stone, Brick, Block, and Poured Concrete Handle Moisture
One reason these basements are hard to read is that not all foundations behave the same way. A finishing approach that is fine over poured concrete can trap moisture against stone. Damp masonry does not always mean the same repair as contaminated drywall, so the first job is knowing what you are working with.
Hover or tap a row to highlight it.
| Foundation material | How it interacts with water and vapor | What that means for finishing and drying |
|---|---|---|
| Stone with lime mortar | Absorbs and releases moisture through the stone and soft mortar joints; designed to breathe | Sealed finishes can trap dampness against it; needs an approach that lets the wall dry |
| Brick | Porous and can wick water upward and inward, especially with aged mortar | Interior coatings may hide staining while moisture stays behind; watch mortar condition |
| Concrete block (CMU) | Hollow cores can hold and move water and vapor through the wall | Moisture can travel unseen inside the block, then surface behind finishes |
| Poured concrete | Denser, but still passes vapor and can seep through cracks and cold joints | Cracks and tie holes are common entry points; drying is easier than open stone |
None of these materials is the food source for mold on its own. Mold grows on the dust, paper facing, wood framing, coatings, and other organic material that sit on or near the masonry. That is why a stone wall can be damp for decades without a problem, and then grow mold quickly once organic finishes are built against it and moisture gets trapped.
Why a Finished Wall Hides the Moisture
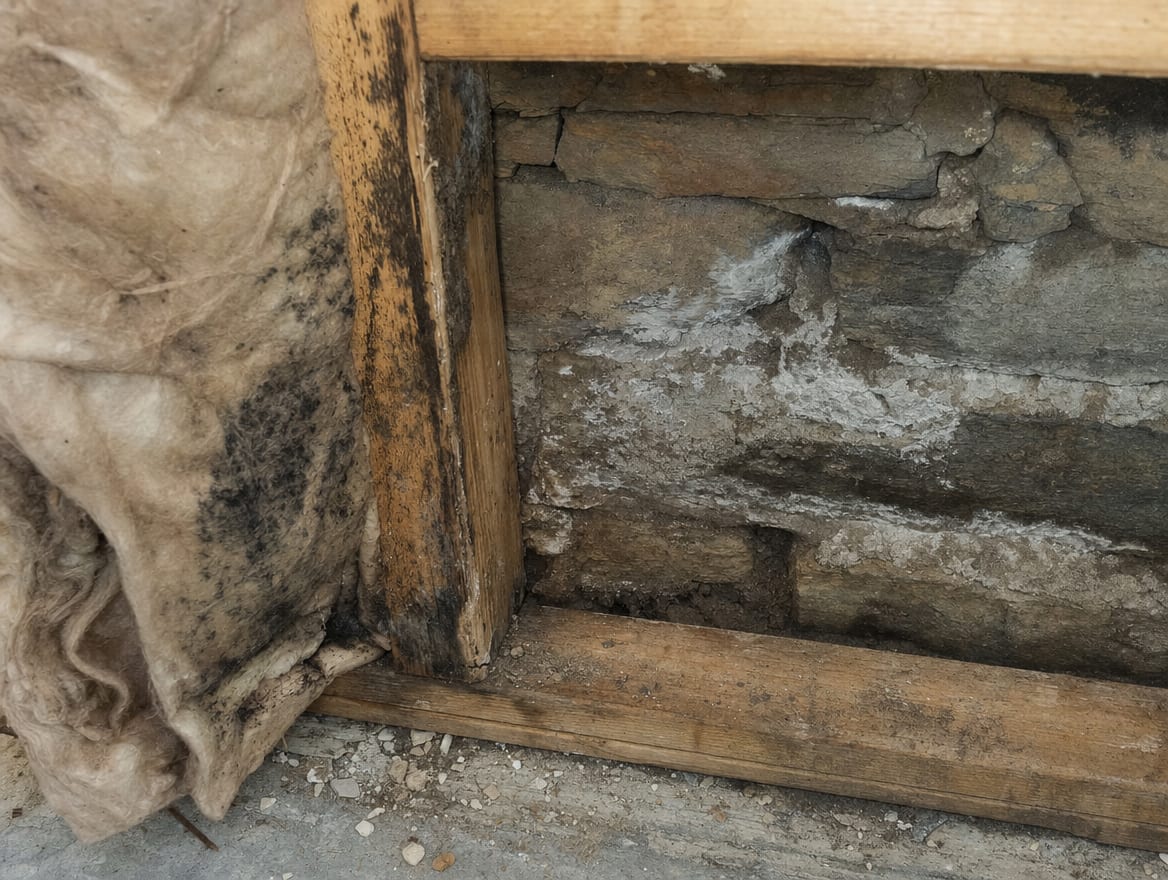
The hardest part of this problem is that the room gives you almost nothing to look at. A finished basement is designed to be clean and comfortable, so the surfaces that would normally warn you, the bare masonry and the exposed framing, are covered. Moisture and any growth develop in the cavity you cannot see, and the first real signal is often just an odor.
Signs of Mold Behind a Finished Basement Wall
Musty odor in a clean-looking room
An earthy or damp smell that lingers even though the space looks finished and tidy, often stronger in humid weather.
Elevated moisture readings
A meter shows high readings along the base of walls, at trim, or on flooring, even with no visible water.
Cupped or stained trim and baseboard
Wood that has swelled, cupped, or discolored near the floor line points to moisture wicking up from behind.
Efflorescence on masonry
A white, powdery mineral crust on exposed stone, brick, or block shows water has been moving through the wall.
A history of past dampness
Prior seepage, a sump event, or a wet season that was cleaned up but never fully diagnosed.
Condensation on cool surfaces
Beads or damp spots on pipes, walls, or floors where warm humid air meets colder masonry.
Any one of these on its own may be minor. Together they tell you to look behind the surface rather than repaint it. A smell without a visible source is not something to ignore, because in a finished basement the visible source is usually hidden by design.
When Moisture Mapping Should Come Before Demolition
It is tempting to answer a mystery smell by tearing out the wall and seeing what is there. On a historic Princeton home, that instinct can do real harm. Original plaster, stone, and woodwork are not easy to replace, and opening the wrong section wastes material and money without answering the question. The better first step is to map the moisture before touching the finish.
Moisture mapping uses meters and, where helpful, thermal imaging to trace where dampness actually lives inside the assembly. It shows whether the moisture is active, seasonal, or a dried-out relic of an old event. It shows how high it wicks and how far it spreads. With that map, the work can be planned as a selective opening, cutting only where the readings and odor point, rather than a full gut of a room that may be mostly sound. A careful mold inspection that includes moisture readings and a foundation-type assessment is what turns guesswork into a plan. It is also what separates a real remediation from a proposal that offers to fog or spray a wall without ever finding the water.
Preserving Sound Historic Materials During the Work
Once the map shows where the problem is, the goal shifts to removing what is contaminated while protecting what is not. In an older Princeton home, the original materials often carry the character and the value, so preservation-sensitive work matters.
Porous finishes that are wet and contaminated, such as drywall, insulation, carpet, and padding, generally have to come out. They hold moisture and growth below the surface and cannot be reliably cleaned in place. Sound historic materials are treated differently. Original stone, brick, solid framing, and salvageable plaster can often be cleaned, dried, and kept rather than demolished. The test is condition and contamination, not age. Over-demolishing removes irreplaceable material for no reason. Under-demolishing leaves wet, contaminated finishes behind and lets the problem return. A good scope walks that line deliberately, opening enough to solve the problem while keeping the historic fabric that is still healthy. When exterior masonry, drainage, windows, or visible vents are involved, work in a designated historic district may also need local preservation review, so that coordination belongs in the plan from the start.
What a Complete Remediation and Drying Scope Includes
A finished-basement project is not a single cleaning step. It is a sequence, and the order matters. Skipping the drying or the source correction is how a fresh, clean wall grows mold again inside a year.
From Odor to Verified-Dry Without Gutting the Room
- 1
Assessment and moisture mapping
Inspect the foundation type, finishes, humidity, and history; map where moisture actually sits before anything is opened.
- 2
Selective opening at mapped areas
Cut only where readings and odor point, preserving sound historic and finished materials elsewhere.
- 3
Containment and HEPA air control
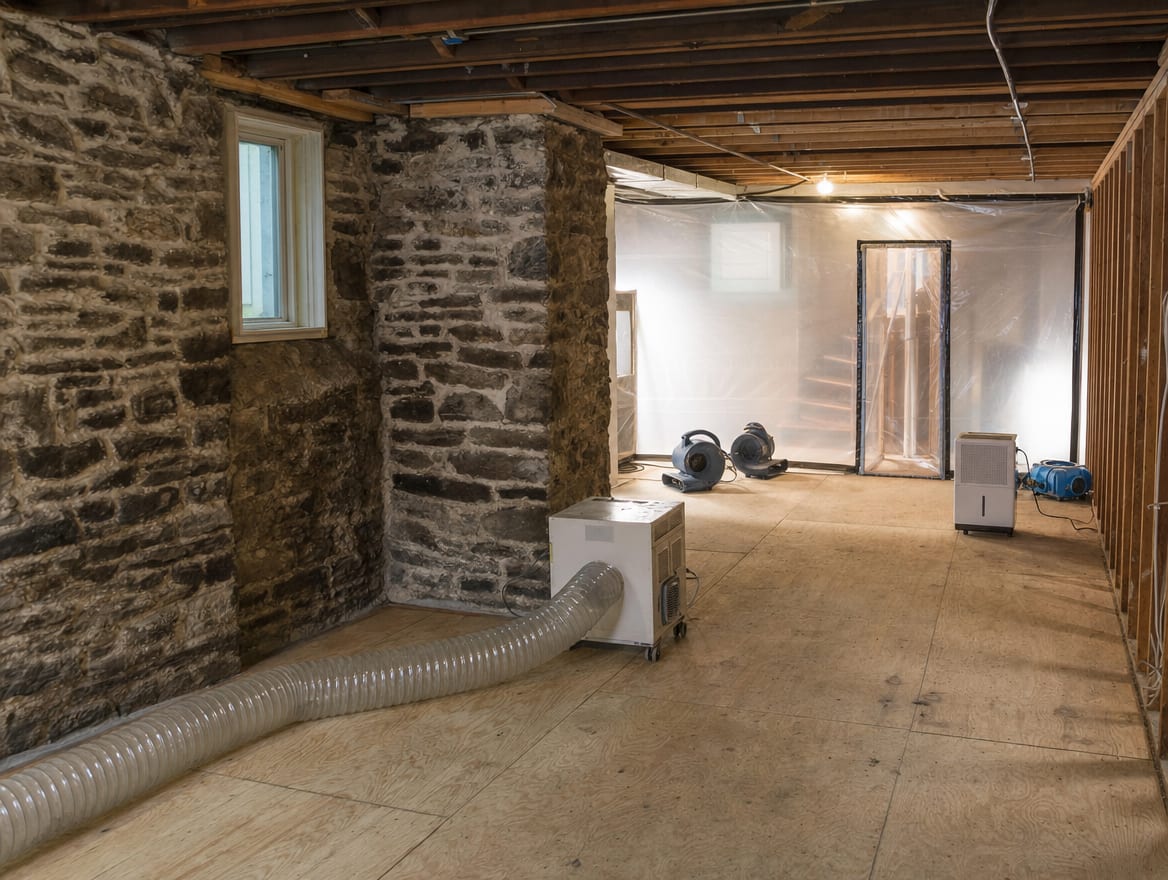
Seal the work area and run HEPA air scrubbing so spores do not spread into the rest of the home during removal.
- 4
Remove unsalvageable finishes, keep what is sound
Take out contaminated drywall, insulation, and flooring; clean and retain solid masonry, framing, and salvageable historic materials.
- 5
Structural drying to a dry standard
Use professional drying and monitoring to pull moisture from the wall assembly and materials, confirmed by readings, not guesses.
- 6
Source and masonry or drainage correction
Address the water entry, whether it is drainage, humidity, plumbing, a sump, or masonry, so the moisture does not come back.
- 7
Verification and a moisture-safe rebuild
Confirm the area is clean and dry, then rebuild in a way that lets the old wall dry rather than trapping moisture again.
That last step is where the old-foundation lesson pays off. Structural drying to a measured standard means the basement is genuinely dry before any finish goes back, and you can read more about how structural drying reaches moisture at depth in the wall and materials. Independent post-remediation verification then documents that the work answered the question it set out to answer, which matters for peace of mind and for any real estate or insurance file. Rebuilding without re-trapping moisture, using assemblies that let the masonry breathe, is what keeps the fix permanent.
When Drainage, Masonry, Plumbing, or HVAC Specialists Are Needed
Remediation removes the contamination, but it does not always fix the reason the moisture arrived. Depending on what the assessment finds, correcting the source may call in other trades, and a complete plan says clearly who handles each piece.
Exterior drainage and grading problems, downspouts dumping against the foundation, or a failing sump may need a drainage or waterproofing contractor. Cracked, spalling, or deteriorated stone and mortar may need a mason who understands historic materials and lime-based repair rather than a hard modern patch that traps water. A plumbing leak or a failed appliance line needs a plumber. High interior humidity, poor condensate handling, or an unbalanced system may need HVAC and dehumidification work. On a home with foundation seepage or standing water history, water extraction and drainage correction come first. The remediation itself is one lane. A basement that stays dry is the result of every lane being handled, which is why source correction is treated as part of the job and not an afterthought. The same care applies to related lower-level spaces, and our guide to crawl space mold in Princeton homes covers how moisture in a connected crawl area can feed a basement problem.
Frequently Asked Questions
Does a finished-looking room mean my basement is fine?
Not necessarily. A finished basement is built to look clean, so the surfaces that would normally warn you are covered. Moisture and mold can sit in the cavity behind the drywall while the room looks perfect. A musty odor, high moisture readings, or cupped trim are reasons to look behind the surface even when nothing is visibly wrong.
Do we have to gut the whole basement?
Usually not. The goal is to remove only what is contaminated and keep what is sound. Moisture mapping before demolition shows where the problem actually is, so the work can be a selective opening rather than a full tear-out. How much comes out depends on the readings, the contamination, and the condition of the materials, not on the age of the room.
Can a historic stone foundation be preserved?
In most cases, yes. The masonry itself is rarely the problem, since mold grows on the organic finishes and dust near it, not on the stone. Sound stone, brick, and solid framing can often be cleaned, dried, and kept. The key is using an approach that lets the old wall dry instead of sealing moisture against it.
Is testing needed before removal?
Not always. Testing is worth doing when it answers a defined question, such as confirming a hidden source or verifying the area is clean after the work. What matters more before removal is a real diagnosis: foundation type, moisture readings, and the source of the water. Color alone does not prove the type of mold, and a single air sample does not prove a hidden cavity is clean.
Will insurance cover basement mold?
It depends on your policy and the cause of the loss. A sudden plumbing failure is often treated differently from long-term seepage, groundwater, or deferred maintenance, and many policies limit mold coverage. A contractor cannot guarantee coverage. What helps is good documentation: dates, photos, moisture readings, drying logs, and the remediation scope, so you can present a clear file to your insurer.
How do we rebuild without trapping moisture again?
By making sure the basement is dry to a measured standard first, correcting the water source, and then choosing an assembly that lets the old foundation dry rather than sealing it. Putting new drywall, insulation, or flooring over a wall that is still damp is the most common way the problem returns. Verification before rebuild is what confirms it is safe to close the wall back up.
Ready to Find What Is Behind the Wall
If a finished basement in an older Princeton home has a musty smell, rising moisture readings, or a history of dampness you never fully explained, the answer is behind the surface, not on it. ExecPro Restoration & Cleaning maps the moisture before opening anything, works to preserve sound historic materials, dries the assembly to a measured standard, corrects the source, and rebuilds so the old wall can breathe. We provide mold remediation across Princeton and central New Jersey, and we document the work so you have verified results for your records, your insurer, or a future sale. To have your basement looked at properly, call (888) 300-3772 or reach out through our contact page and we will help you get from an odor to an answer.
Basement Mold and Old-Foundation Terms
Tap a term to see what it means.
Efflorescence. A white, powdery mineral crust left on masonry as water moves through and evaporates, a sign moisture has been passing through the wall.
Serving Princeton
ExecPro Restoration & Cleaning provides mold remediation services in Princeton, NJ, from inspection and testing through removal, drying, and post-remediation verification. Call (888) 300-3772 for 24/7 emergency response.
Related Articles
The Closed-House Basement: Finding Hidden Mold in a Reopened Deal, NJ Home
A closed Deal, NJ shore home can look dry when you reopen it and still hide basement mold. Why source history and moisture mapping beat what you can see.
Sump, Slab, and Shared Drainage: Basement Mold Across Three Kinds of Home in Princeton Junction, NJ
Basement mold in Princeton Junction NJ often traces to a sump or drainage failure. See how the plan changes for a detached home, townhouse, or condo unit.
Old House, New Systems: Air Quality Testing for Historic Homes and Rentals in Princeton, NJ
Older Princeton homes with modern HVAC, rentals, and renovations need a smarter air quality test. Here is how building history changes what to test and how to read it.